KubeSlice


Avesha Enterprise for KubeSlice
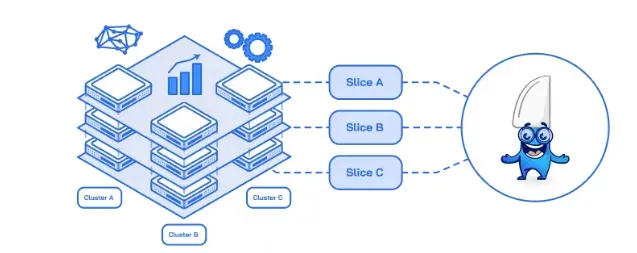
Service Connectivity Layer for managing fleet of clusters for better application performance
Smart Scaler
Smart Scaler
Predictive autoscaling based on application behaviors
Elastic Grid Service


EGS
Single/Multi-cluster and multi-cloud GPU provisioning and management platform
1.16
KubeSlice Enterprise
released version 1.16.0
2.17
Smart Scaler
released version 2.17.0
1.16
Elastic Grid Service
released version 1.16.0


EGS Resources
Explore Resources for Elastic Grid Service

Analyst Reports
Navigating Key Metrics for Growth and Success

Blog
Source for Trends, Tips, and Timely Topics

Documentation
The Blueprint for Mastering Tools and Processes

Customer Case Studies
Success stories from our valued customers and partners


Avesha Resources / Blogs
A Step-by-Step Guide to Acquiring and Running KubeSlice Enterprise with a Trial License

Md Imran
Senior Software Engineer II at Avesha

Introduction
KubeSlice, a powerful networking solution, facilitates secure and highly available connectivity between multiple Kubernetes clusters. By creating a flat overlay network, KubeSlice enables seamless communication between pods of an application running across different clusters. This overlay network acts as an application slice or a dedicated Virtual Private Cloud (VPC) that spans multiple clusters. With KubeSlice, pods can effortlessly connect to the overlay network and communicate with each other across cluster boundaries. link
KubeSlice’s open-source architecture consists of various components that collaborate to manage the lifecycle of connected clusters. If you want to explore or contribute to the project, you can find the source code and documentation on the official KubeSlice GitHub repository.
GitHub Repository: KubeSlice
Key Features of Enterprise
Enhanced KubeSlice Manager / The UI: A Centralized Hub for Advanced Management at the heart of KubeSlice Enterprise lies the enhanced KubeSlice Manager. This centralized hub provides administrators with powerful tools for managing and controlling the lifecycle of the slice overlay network in multi-cluster environments. With the enhanced KubeSlice Manager, administrators can take advantage of the following advanced features:
- Resource Quotas for Kubernetes Cluster: KubeSlice Enterprise introduces resource quota management, allowing administrators to allocate resources efficiently and prevent resource contention. Organizations can ensure fair resource allocation and optimal utilization by defining and enforcing resource limits for applications running across multiple clusters.
- Node Affinity Kubernetes Cluster: KubeSlice Enterprise offers node affinity capabilities, enabling administrators to define preferences for pod placement based on node characteristics. With node affinity, organizations can optimize resource utilization and improve performance by ensuring that pods are scheduled on nodes that meet specific requirements or have specific attributes. This feature allows for greater control over pod placement and can be particularly useful in scenarios where certain nodes need to be targeted for specific workloads or applications.
- RBAC Management Kubernetes Cluster: Security and access control are critical in multi-cluster environments. KubeSlice Enterprise offers advanced RBAC management capabilities, enabling administrators to define custom roles and permissions. With fine-grained RBAC controls, organizations can ensure that the right level of access is granted to different stakeholders within the organization, enhancing security and maintaining strict governance over the slices.
With the enhanced KubeSlice Manager serving as the central point of control, administrators can efficiently manage and optimize their connected clusters. The Resource Quotas, Node Affinity, and RBAC management for Kubernetes Cluster features can be conveniently accessed and configured from this single management interface, providing a unified and streamlined approach to multi-cluster management.
Trial License: Identifying the Cluster and Installation
KubeSlice provides multiple installation options to suit different preferences and deployment scenarios by using either Helm or the KubeSlice CLI. we will explore the installation using Helm. For information on installing KubeSlice using the CLI, please refer to the KubeSlice CLI documentation.
For KubeSlice Enterprise installations, you will need to obtain image pull credentials to access the required container images. To acquire these credentials, you can follow the instructions provided in the Kubeslice Registration guide. Within 15 minutes you will get an email with credentials.
Before proceeding with the installation of KubeSlice, it is essential to ensure that you have fulfilled the prerequisites outlined in the KubeSlice Prerequisites documentation.
KubeSlice trial licenses are designed to support the evaluation of KubeSlice in different cluster networking scenarios. The trial license is valid for 90 days with a 5-day grace period. The trial license supports one controller cluster and multiple worker clusters. The worker clusters can be attached to or detached from a slice, but the controller cluster must remain the same for the entire trial period.
To obtain a trial license for KubeSlice, it is essential to identify the cluster where you intend to deploy the software. The process differs based on whether the cluster is an air-gap environment or not. Let’s explore both scenarios:
Air-Gap Cluster
If your cluster is in an air-gap environment, meaning it does not have direct access to the internet, you will need to follow a manual process to obtain the trial license. Here are the steps:
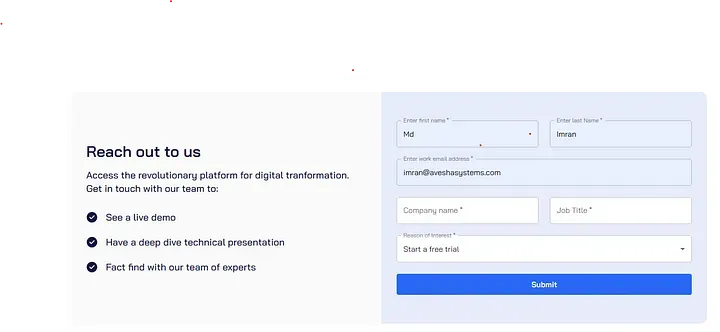
Send an email to support@avesha.io, specifying that you require a trial license for your air-gap cluster. Or fill out this form link with the reason Start a free trial.
The support team at Avesha will guide you through the process and after sharing the necessary details Avesha will provide you with the trial license file as a secret.
note that obtaining a trial license for air-gap clusters may involve additional steps and coordination with the Avesha support team. They will work closely with you to ensure a smooth trial experience.
Once you receive the trial license file, you have the flexibility to apply the license secret either before or after the installation of the KubeSlice Controller. This allows you to choose the approach that best suits your deployment workflow and preferences.
If you prefer to apply the trial license secret before installing the KubeSlice Controller, you can follow these steps:
Step 1: apply trial license secret.
Apply the secret to your controller cluster using the appropriate Kubernetes command. For example:
kubectl create namespace kubeslice-controller
kubectl apply -f <path_to_license_secret_file>
Step 2: KubeSlice-controller installation
please refer to the Install the KubeSlice Controller document for more details.
Create Controller values file YAML.
Create the controller.yaml file using the following template.
kubeslice:
  controller:
    loglevel: info
    rbacResourcePrefix: kubeslice-rbac
    projectnsPrefix: kubeslice
    endpoint: <endpoint of your cluster>
  license:
    # possible license type values ["kubeslice-trial-license"]
    type: kubeslice-trial-license
    # possible license mode - ["auto", "manual"]
    mode: manual
    # please give company-name or user-name as customerName
    customerName: ""
imagePullSecrets:
  repository: https://index.docker.io/v1/
  username: <Provide from Registration Email>
  password: <Provide from Registration Email>
  email:    <Provide from Registration Email>
To retrieve the cluster endpoint, you can follow the steps outlined in the Get the Cluster Endpoint section of the documentation.
Replace customerName with the name of your organization. Set the mode value to "manual" to specify that you acquire the license manually. Additionally, replace <imagePullSecrets> with the actual image pull secret you received via email in the previous step.
Install KubeSlice-Controller
To install the KubeSlice Controller using the YAML manifest file, you can follow the steps outlined in the Apply Controller YAML section of the documentation.
Non-Air-Gap Cluster
For non-air-gap clusters, KubeSlice simplifies the process of obtaining a trial license by automatically fetching it from the licensing server. Here’s how it works:
- Deploy the KubeSlice Controller using the Helm installation method, as described in the previous section. Install the KubeSlice Controller document
Sample Controller values file YAML for Auto Mode.
kubeslice:
  controller:
    loglevel: info
    rbacResourcePrefix: kubeslice-rbac
    projectnsPrefix: kubeslice
    endpoint: <endpoint of your cluster>
  license:
    # possible license type values ["kubeslice-trial-license"]
    type: kubeslice-trial-license
    # possible license mode - ["auto", "manual"]
    mode: auto
    # please give company-name or user-name as customerName
    customerName: ""
imagePullSecrets:
  repository: https://index.docker.io/v1/
  username: <Provide from Registration Email>
  password: <Provide from Registration Email>
  email:    <Provide from Registration Email>
- During the installation, the KubeSlice Controller will automatically contact the licensing server to fetch a trial license for your cluster
By automatically fetching the trial license, KubeSlice eliminates the need for manual intervention and enables a seamless trial experience for internet-connected clusters.
Install KubeSlice Manager & Create a Project
To install the KubeSlice Manager component, you can follow the steps outlined in the Install KubeSlice Manager section of the documentation.
Login to KubeSlice Manager
To log in to the KubeSlice Manager, you can follow the steps outlined in the KubeSlice Manager Login section of the documentation.
Validate the Trial License
On the KubeSlice Manager, you can validate the license installed on KubeSlice.
To validate the license:
Expand Settings on the left sidebar.

Click License from the menu to see the license trial period and key.
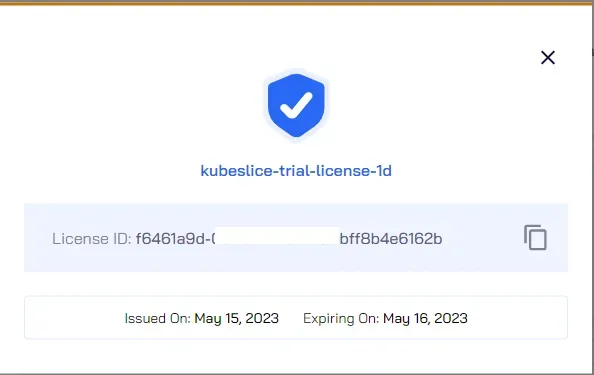
You can also get the License ID using the following command:
kubectl get secret kubeslice-license-file --template='{{index .data "license-id"}}' -n kubeslice-controller | base64 -dTroubleshooting Acquiring a Trial License for KubeSlice
If you encounter issues with acquiring a trial license for KubeSlice, you can refer to the Licensing Issues section of the troubleshooting guide. This section provides guidance on resolving common licensing-related problems.
If the troubleshooting steps do not resolve the problem, reach out to the support team at support@avesha.io for further assistance. Include relevant details about the issue you are experiencing to help them better understand and resolve the problem.
Exploring Key KubeSlice Manager Operations
- Cluster Operations: Simplify and Streamline Cluster Management with KubeSlice Manager
- Slice Operations: Enhance Application Connectivity Across Clusters using KubeSlice Manager
- Manage Resources: Optimize Resource Quotas with KubeSlice Manager
- Assign Node Labels: Fine-tune management of common node resources with KubeSlice Manager
- Manage RBAC: Fine-grained Access Control with KubeSlice Manager
These links provide detailed documentation on various important operations and features offered by the KubeSlice Manager. By exploring these resources, you can gain a deeper understanding of how to effectively manage and optimize your clusters, slices, resources, node affinity, and RBAC policies using KubeSlice Manager.
Concluding Thoughts: Unlocking the Power of Multi-Cluster Connectivity with KubeSlice
In conclusion, KubeSlice is a powerful solution that enables secure and highly available connectivity between multiple clusters. KubeSlice simplifies the management of distributed applications and enhances their resilience. In this article, we explored the introduction of KubeSlice, its enterprise features, the installation process, acquiring a trial license, and the essential operations offered by the KubeSlice Manager.
Whether you are looking to improve application connectivity, manage resources efficiently, fine-tune access controls, or optimize cluster operations, KubeSlice provides the necessary tools and functionalities. By leveraging its enterprise features, such as resource quotas, node labels, RBAC management, and more, you can take your multi-cluster deployments to the next level.
We encourage you to explore the official KubeSlice documentation for more in-depth information and guidance on how to maximize the benefits of this powerful solution. Start harnessing the capabilities of KubeSlice today and unlock new possibilities for your distributed applications.
Happy Slicing!


Copied