KubeSlice


Avesha Enterprise for KubeSlice
Service Connectivity Layer for managing fleet of clusters for better application performance
Smart Scaler
Smart Scaler
Predictive autoscaling based on application behaviors
Elastic Grid Service


EGS
Single/Multi-cluster and multi-cloud GPU provisioning and management platform
1.16
KubeSlice Enterprise
released version 1.16.0
2.17
Smart Scaler
released version 2.17.0
1.16
Elastic Grid Service
released version 1.16.0


EGS Resources
Explore Resources for Elastic Grid Service

Analyst Reports
Navigating Key Metrics for Growth and Success

Blog
Source for Trends, Tips, and Timely Topics

Documentation
The Blueprint for Mastering Tools and Processes

Customer Case Studies
Success stories from our valued customers and partners


Avesha Resources / Blogs
Streamlining the Worker Operator Installation
A Journey towards Simplification

Priyank Upadhyay
Senior Software Engineer, Avesha

TL;DR: In this blog post, we discussed how our engineering team addressed the challenges posed by the manual installation process of the Worker Operator. By introducing KubeSlice's Auto Mode, users can now register their clusters by simply uploading the kubeconfig file, eliminating the need for complex manual steps. This automated installation offers several advantages, including simplified user experience, consistent and error-free installations, easy customization options, and simplified troubleshooting. With the automated installation process, users can focus on utilizing the KubeSlice's capabilities without the hassle of manual setup, leading to increased efficiency and productivity.
In the ever-evolving landscape of software engineering, streamlining processes and automating tasks are paramount to enhancing efficiency and productivity. One such area that our engineering team tackled was the installation of the Worker Operator, a critical component in managing and orchestrating slice operation on a worker cluster. In this blog post, we will delve into how we automated the process of Worker Operator installation through UI, revolutionizing the way our users interact with KubeSlice.

With the release of KubeSlice Enterprise v0.11.0, worker clusters can now be registered with KubeSlice simply by uploading a Kubeconfig file of the cluster. KubeSlice installs the worker operator on the cluster, avoiding the need for manual installation.
The Problem: Tedious and Complex process of Manual Installation

Installing the Worker Operator was once a laborious and intricate process that posed significant challenges for our users. Manual installation involved a series of complex steps, requiring a deep understanding of the underlying architecture and meticulous execution. This cumbersome approach often resulted in errors, inconsistencies, and a substantial investment of time and effort.
After verifying the mandatory prerequisites, a user would have to undergo the following steps to perform a successful worker-operator installation:
- Create the Cluster Registration YAML File
- Apply the Cluster Registration YAML File
- Verify the Registered Clusters
- Install the Slice Operator
- Validate the Slice Operator Installation
Recognizing the need for a more streamlined solution, our engineering team set out to revolutionize the installation process and simplify it for our users.
Introducing Auto Mode: Simplifying Cluster Registration

With the introduction of Auto Mode, now a user can simply upload a kubeconfig file for the cluster and Kubeslice manager will take care of the rest.
After logging in with KubeSlice Manager
- On the Register Clusters page, click Add Cluster to register a cluster.
- Choose Automated mode and Click Next.
- Enter the desired name of the cluster in the text box.
- Drag and drop the cluster’s kubeconfig file.
- Click the Import Cluster button to register a cluster.
The cluster status will transition from InProgress > Pending > Registered after all the Slice Operator components are up and running.
User can also click on the show logs button to view real time logs of the installation process.
Behind the Scenes: Automating Worker Operator Installation
Let see what happens after the user clicks the Import Cluster button.
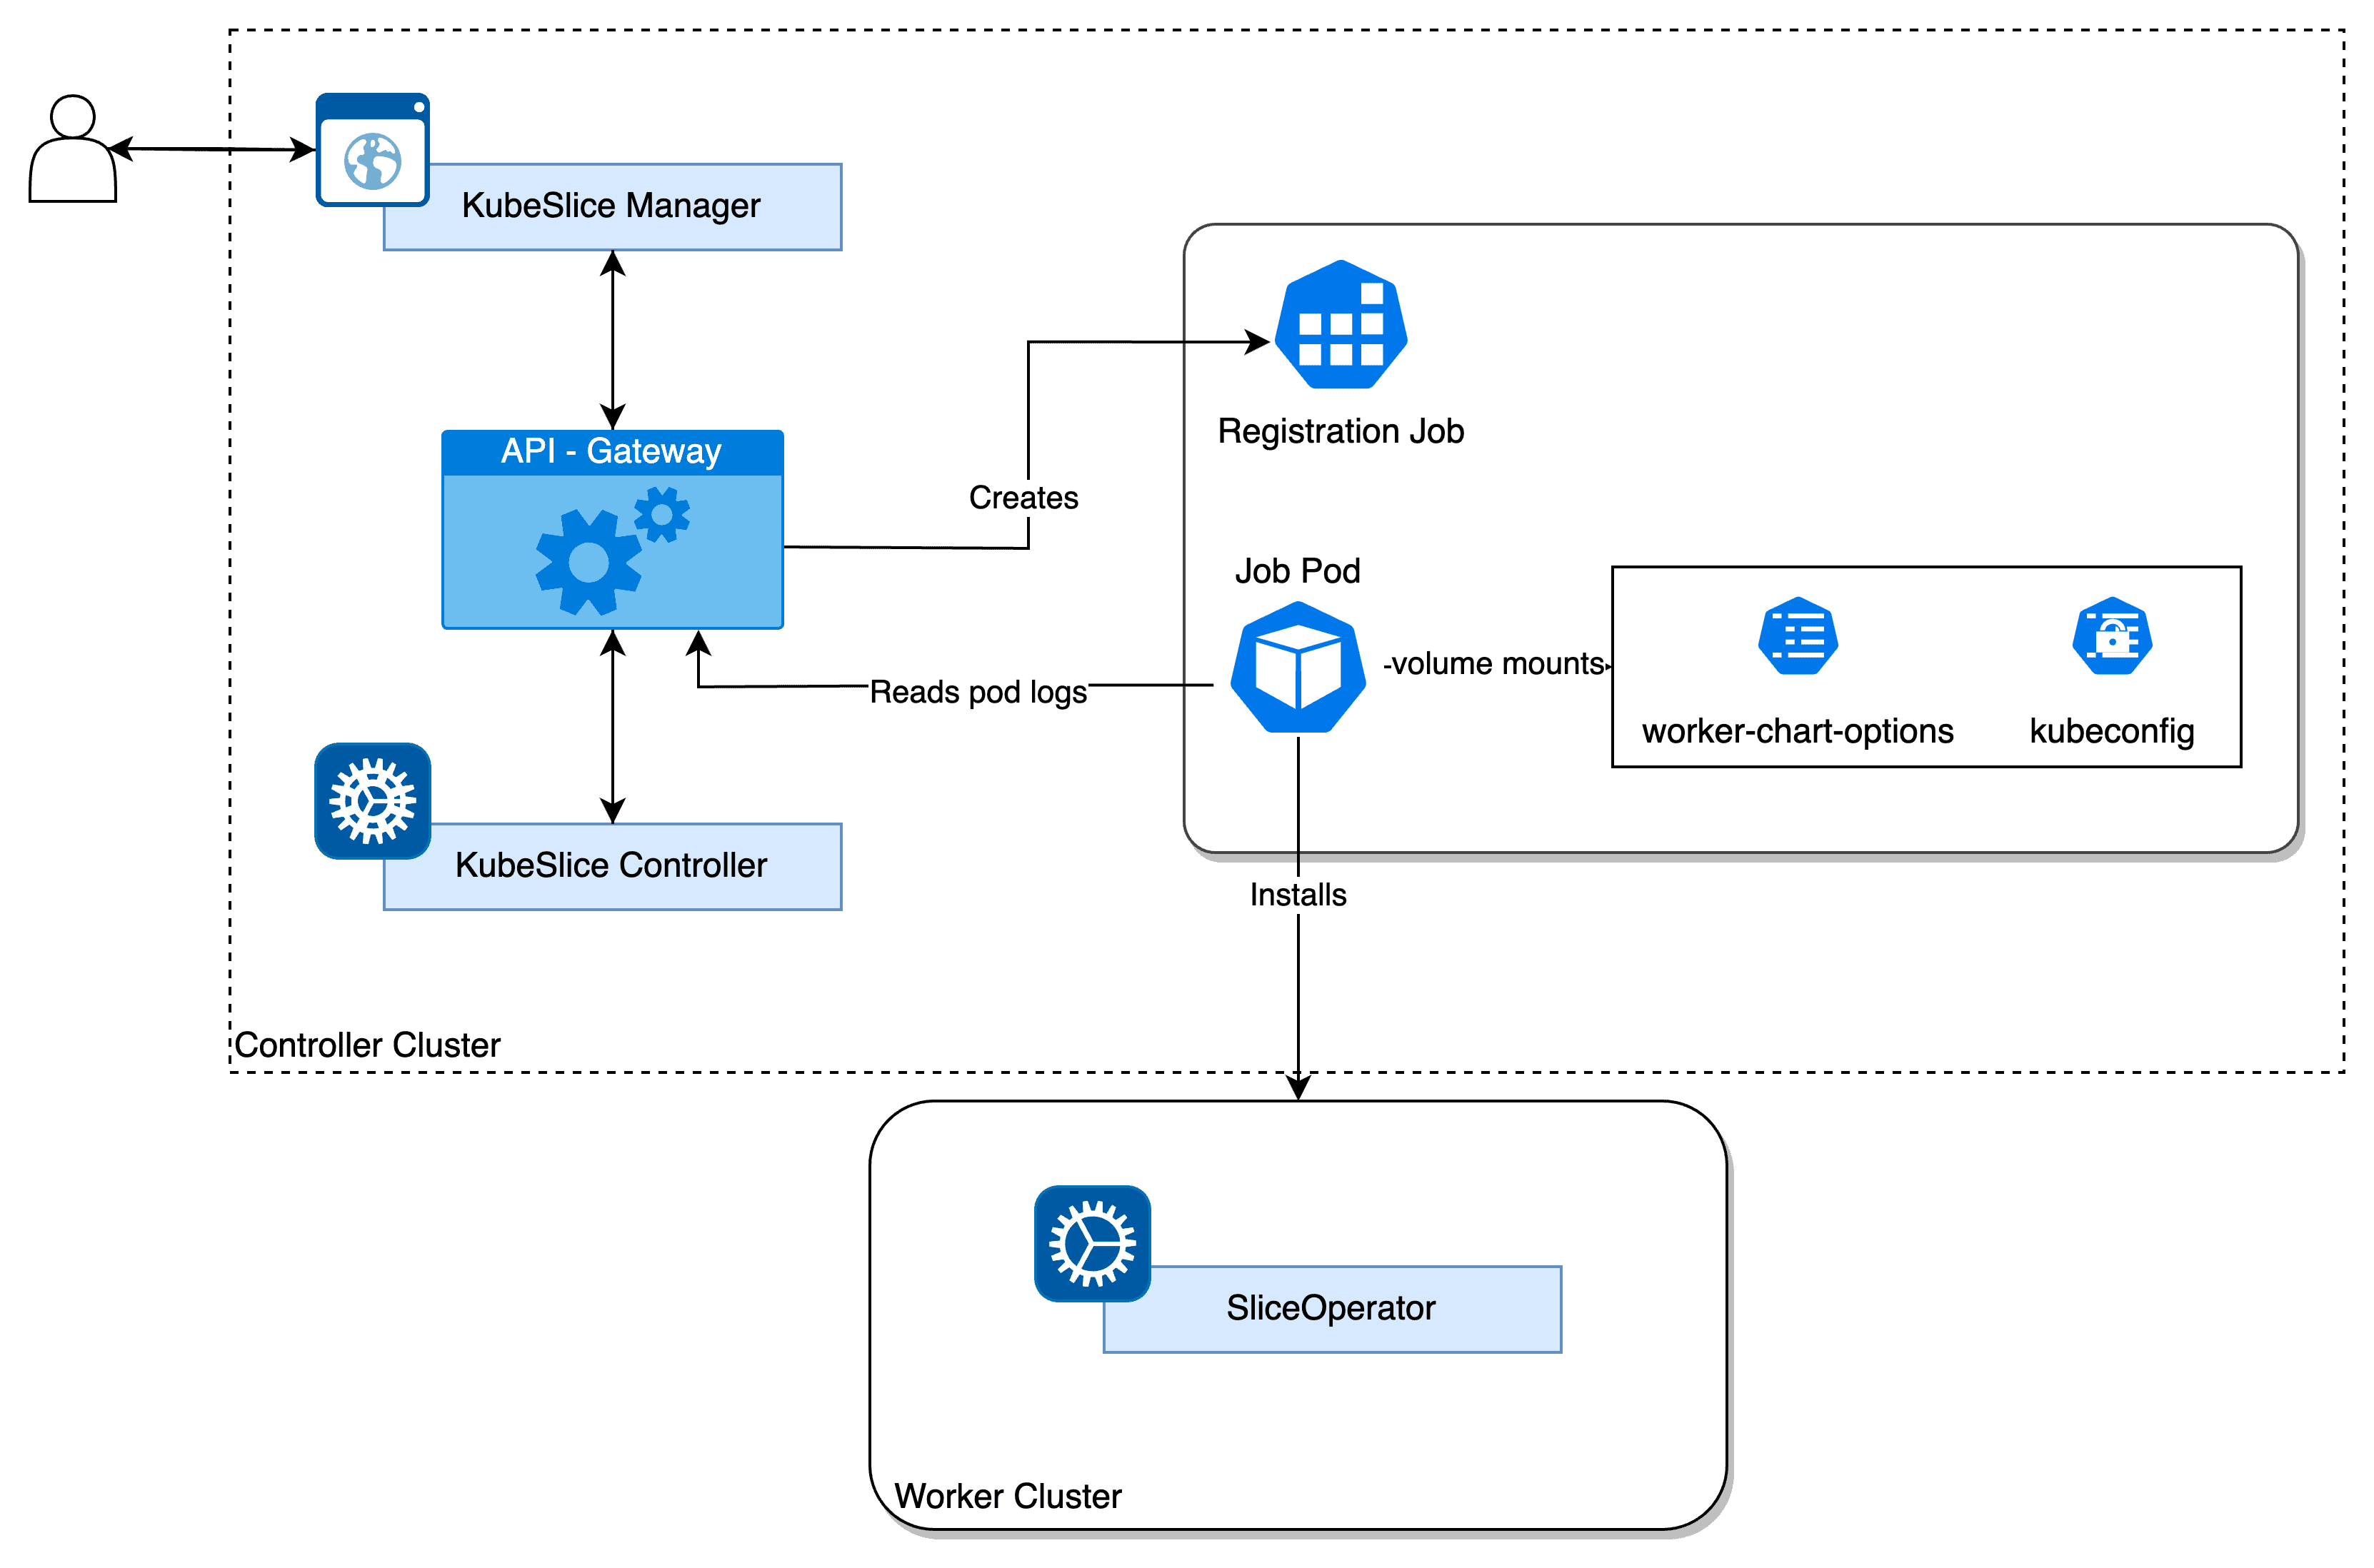
Architectural flow of auto register job
The implementation is pretty straightforward. A worker-chart-options config map is created at the time of KubeSlice Manager installation, which contains customization options for worker-operator installation. We will discuss more about the configurations later.
Once a user uploads kubeconfig file with access to the worker cluster, UI sends an API request to the API-GW which then:
- creates a Cluster object with the specified name in the project namespace
- creates a k8s secret with the uploaded kubeconfig file contents
- creates a k8s job mounting the secret and the worker-chart-options config map
- watches the pod logs and streams it to the UI via a websocket connection
The job is responsible to perform the worker-operator installation. The installer job performs the following:
- Verify the prerequisites, like node labels and access to the cluster using the kubeconfig file.
- Adding KubeSlice Helm Charts from the Helm repository.
- Prepare values file for the worker-chart installation. Defaults and image pull credentials are picked from the controller installation.
- Execute the helm install command to perform the installation.
- Verify the worker-operator pods are up and running.
Getting in Control : Customizing the Worker Operator installation
A user can customize some options before installing Worker operator using the Auto Mode. You can edit or modify the worker-chart-options parameters in the ConfigMap file located in the kubeslice-controller namespace in the controller cluster for a customized worker installation.
To edit a ConfigMap file:
- Switch the context to controller cluster:
kubectx <controller cluster-name> - Switch to the
kubeslice-controllernamespace. - Edit the ConfigMap using the following command:
kubectl edit configmap woker-chart-optionsThe following are the customization options supported:
workerChartOptions:
  metricsInsecure: # [Optional] Default is false. Set to true if required to disable TLS for metrics server.
  repository: # [Optional] Helm repository URL for worker charts. Default is `https://kubeslice.aveshalabs.io/repository/kubeslice-helm-ent-prod/`
  releaseName: # [Optional] Release name of kubeslice-worker. Default is `kubeslice-worker`
  chartName: # [Optional] Name of the chart. Default is `kubeslice-worker`
  chartVersion: # [Optional] Version of the chart. Default is the latest version
  debug: # [Optional] Default is false. Set to true if required to enable debug logs for kubeslice-worker
  helmCredentials:
    username: # [Optional]
    password: # [Optional]
  imagePullSecrets:
    repository: # [Optional]
    username: # [Optional]
    password: # [Optional]
    email: # [Optional]
Unlocking the Potential: Benefits and Advantages of Auto Mode

Apart from removing the tediousness and manual efforts required to Install worker-operator, Auto Mode also eliminates errors and inconsistencies in the installation steps.
The user does not need to be aware of the underlying architecture to be able to perform the installation and start experiencing the benefits of KubeSlice.
Even a customised installation (eg a custom worker-operator version) can be done by simply editing the worker-chart-options config map present in the controller cluster under kubeslice-controller namespace.
Trouble the Trouble: Troubleshooting errors during installation

Auto Mode makes it super easy to perform the installation, still one might encounter errors during the installation. The worker cluster might not have the node labeled with kubeslice.io/node-type=gateway, or the kubeconfig provided might not have correct access to install Helm charts. If the installer job gets any error during the installation, the status of the cluster is marked as failed.
What to do when Cluster status changes to failed
Verify the logs by clicking on the log icon. You can download the logs and share if raising a support ticket. To retry, delete the cluster and try again.
Visit our documentation for more troubleshooting tips: TROUBLESHOOTING | Avesha Docs
Conclusion: Empowering Users with Simplicity and Efficiency
By empowering users with simplicity and efficiency, the automated installation process through KubeSlice's Auto Mode streamlines the experience and maximizes the productivity of our users. With the manual installation woes eliminated, users can fully leverage the power of the Worker Operator and focus on their core tasks.


Copied